Open EXR 2.0


ILM and Weta Digital release OpenEXR 2.0 with major upgrade features.


ILM and Weta Digital have released OpenEXR 2.0, the major version update of the open source HDR file format first introduced by ILM and maintained and expanded by a number of key industry leaders including Weta Digital, Pixar Animation Studios, Autodesk and others.  The release includes a number of new features that align with the major version number increase. Amongst the major improvements are:


Deep Data support - Pixels can now store a variable-length list of samples. The main rationale behind deep images is to enable the storage of multiple values at different depths for each pixel. OpenEXR 2.0 supports both hard-surface and volumetric representations for Deep Compositing workflows.


Multi-part Image Files - With OpenEXR 2.0, files can now contain a number of separate, but related, data parts in one file. Access to any part is independent of the others, pixels from parts that are not required in the current operation don't need to be accessed, resulting in quicker read times when accessing only a subset of channels. The multipart interface also incorporates support for Stereo images where views are stored in separate parts. This makes stereo OpenEXR 2.0 files significantly faster to work with than the previous multiview support in OpenEXR.


Optimized pixel reading - decoding RGB(A) scanline images has been accelerated on SSE processors providing a significant speedup when reading both old and new format images, including multipart and multiview files.


Namespacing - The library introduces versioned namespaces to avoid conflicts between packages compiled with different versions of the library.
Although OpenEXR 2.0 is a major version update, files created by the new library that don't exercise the new feature set are completely backwards compatible with previous versions of the library. By using the OpenEXR 2.0 library, performance improvements, namespace versions and basic multi-part/deep reading support should be available to applications without code modifications.


This code is designed to support Deep Compositing - a revolutionary compositing workflow developed at Weta Digital that detached the rendering of different elements in scene. In particular, changes in one layer could be rendered separately without the need to re-render other layers that would be required to handle holdouts in a traditional comp workflow or sorting of layers in complex scenes with elements moving in depth. Deep Compositing became the primary compositing workflow on Avatar and has seen wide industry adoption. The technique allows depth and color value to be stored for every pixel in a scene allowing for much more efficient handling of large complex scenes and greater freedom for artists to iterate.

True to the open source ethos, a number of companies contributed to support the format and encourage adoption. Amongst others, Pixar Animation Studios has contributed its DtexToExr converter to the OpenEXR repository under a Microsoft Public License, which clears any concerns about existing patents in the area, and Autodesk provided performance optimizations geared towards real-time post-production workflows.


Extensive effort has been put in ensuring all requirements were met to help a wide adoption, staying true to the wide success of OpenEXR. Many software companies were involved in the beta cycle to insure support amongst a number of industry leading applications. Numerous packages like SideFX's Houdini, Autodesk's Maya, Solid Angle's Arnold renderer, Sony Pictures Imageworks' Open Image IO have already announced their support of the format.

Open EXR 2.0 is an important step in the adoption of deep compositing as it provides a consistent file format for deep data that is easy to read and work with throughout a visual effects pipeline. The Foundry has build OpenEXR 2.0 support into its Nuke Compositing application as the base for the Deep Compositing workflows.


OpenEXR 2.0 is already in use at both Weta Digital and Industrial Light & Magic. ILM took advantage of the new format on Marvel's The Avengers and two highly anticipated summer 2013 releases, Pacific Rim and The Lone Ranger. Recent examples of Weta Digital's use of the format also include Marvel's Avengers as well as Prometheus and The Hobbit. In addition, a large number of visual effects studios have already integrated a deep workflow into their compositing pipelines or are in the process of doing so including:, Sony Pictures Imageworks, Pixar Animation Studios, Rhythm & Hues, Fuel and MPC.

In addition to visual effects, the new additions to the format, means that depth data can also be assigned to two-dimensional data for a use in many design fields including, architecture, graphic design, automotive and product prototyping.


Jack Gets a Giant Re-Imagining

Image
Jack climbs the mighty beanstalk in Jack the Giant Killer. All images courtesy of Warner Bros. Pictures.

Director Bryan Singer not only got more kid-friendly with Jack the Giant Slayer (riffing on The Princess Bride and Clash of the Titans), but he also fully embraced virtual production and 3-D for the first time. Indeed, he played in the volume during the mocap sessions right along with the actors: choreographing the action and making selects right on through principal photography using the Simul-Cam system for integrating live action and virtual components.
VFX vet Hoyt Yeatman (The Abyss) oversaw Jack as the visual effects production supervisor. He and the filmmakers worked with Digital Domain and Giant Studios, which collaborated on the virtual production process. Meanwhile, The Third Floor provided previs of action sequences and MPC created the crucial CG beanstalk, sharing assets with DD when necessary.
"When we started three years ago, we talked about Avatar-like characters but this would be in real environments and Bryan wanted athletic and smart giants," Yeatman explains. "When the idea of Simul-Cam was first proposed it was an optical tracking system, but we shot Jack on location and very often in historical locales such as a cathedral that had restrictions for how you could shoot inside. We ended up shaft encoding, which came from the old days of motion control, and that worked really well and since the 3-D camera rigs [the movie was shot natively on Red Epic cameras] almost always lived on the cranes. It was a perfect platform to work on, so the guys at Giant Studios wrote some code and built a virtual model of the cranes accurately used for geometry reasons. So we were able to Simul-Cam anytime we wanted into those scenes and we brought Giant Studios out to the UK and built a mocap stage at Shepperton Studios."
Image
Fye

It was critical for the filmmakers to have an accurate understanding of the 20-to-24-foot-tall CG giants' performances, position and timing while shooting scenes where giants drove the primary action and interacted with live actors; as well as for all-CG or mostly-CG sequences featuring giants. As Fallon, the two-headed giant, was performed by two actors simultaneously, Bill Nighy and John Kassir, the use of virtual production was particularly important in that it enabled both of them to pre-visualize the final product and base their performances around this unique character trait.
In a mocap shoot prior to principal photography, sequences driven by giants were choreographed and directed by Singer; Giant Studios capturing all body performance and Digital Domain’s virtual production team capturing all facial performance (using four mounted face cameras), simultaneously as a single, cohesive performance, in real-time in 3-D.
Image
Fumm (center)

Digital Domain’s virtual production team then created "Kabuki": projecting video from its face cameras onto the giants’ characters so Singer and editorial could view the actors’ performance quickly and cost-effectively within the real time version of the performance captured. Digital Domain delivered the Kabuki asset to Giant Studios where it was integrated it into the real-time scene, which could then be viewed in MotionBuilder or played out as QuickTime files for editorial. This process enabled Singer and the editorial team to make performance selections from all options gathered via real-time render of the body performance on set plus witness camera material from the face cameras. To ensure all motions maintain the weight & scale of giants, most motions were slowed down by 15-20%.
Those cohesive giant performances were then used for on-set references during principal photography where they were viewed by Singer, cinematographer Tom Sigel and VFX supervisors through the Simul-Cam or viewed as QuickTime references, so they could see the giants’ performance, scaled correctly (at a factor of four) alongside live actors, within the CG environment. This additionally created great time and cost efficiencies in the post-visualization stage as Digital Domain was able to respond quickly to directorial and editorial changes in giants’ position, timing, performance and eye lines.
Image
Fallon

"We had to raise the bar for virtual production for these actors to become these characters," remarks Stephen Rosenbaum, who came over to Digital Domain from Weta Digital after working on the Oscar-winning Avatar. "And that was huge because when you see Fallon delivering dialogue or emoting, you pick up Bill Nighy's expressions and mannerisms that come through in the character. And it gave the editors a lot to work with as well early on in the production. They didn't have to wait months for us to develop the blocked animation and then get down into dialogue later and ultimately everyone wondering whether or not the performance was going to come through."
The challenge of the giants from a design perspective was that Singer wanted them to look unique as well as individually distinctive -- and not only the eight hero characters. For example, since the giants were sprung from the landscape, their faces resembled rock formations with boils and other blemishes on their skin. At the same time, Fee, Fye, Foe and Fumm were different from one another. Fee was tall and strong with stringy hair; Fye was tall and bald and triangular; Foe was short, rotund and bald.
But Fallon, of course, proved the most daunting and time consuming character. During script development Singer presented the idea of a two-headed giant, which he got from looking at Jack the Giant Killer illustrations and recalling the interactive humor from How to Get Ahead in Advertising. "Design wise, it proved to be a significant challenge," Rosenbaum continues. "You can't just stick another head on his shoulder. So we went through numerous iterations and came up with a kind of cystic growth but with his own personality. In terms of virtual production, you see Bill Nighy and John Kassir as his grunting side-kick coming together to create this character."
Image
The Cook

According to DD's animation director, Jan Philip Cramer, the action-packed kitchen sequence in which Jack (Nicholas Hoult), Isabelle (Eleanor Tomlinson) and Elmont (Ewan McGregor) interact with the Cook giant (Philip Philmar) was the most complex. "It involved all the players: Digital Domain, The Third Floor, Giant Studios and our in-house facial capture for Kabuki, and it all came together," Cramer says. "They have different eye lines and different actions throughout the sequence. And it shows up the scale really nice. We planned it well and communicated well between the departments to make sure all the right assets were there. Once we finished mocap, we were able to cut it up and find good angles for principal and they were matched tightly with the previs and with the performance from the actors."
But things changed in production. Isabelle became a virtual character in the cage in the kitchen and rather than having to go back and mocap that, they had already done the sequence in the volume and had her data and could cut to that.
Image
MPC's digital beanstalk.

Meanwhile, MPC (under the supervision of Greg Butler) was responsible for the massive digital beanstalk. The production design and special effects teams created several 30-foot models. These were then animated, digitally enhanced and extended by MPC. DMP’s of the countryside below and digital cloudy skies above were later composited in.
The beanstalk was created using animated curves that had sections of interlocking beanstalk geometry pieces. This was then rendered in RenderMan, with the team relying heavily on ray tracing. Key framed digital doubles were used for the majority of the characters ascending the stalk.
Having created the beanstalk itself, the teams were then charged with its destruction. A combination of CG and practical elements were used to fill in the shots where support vines fly to the air and the earth explodes as roots are ripped out of the earth. For the wider shots showing the beanstalk falling across the landscape, procedural modeling and rendering techniques had to be developed.
Image
The beanstalk's destruction was done with a combination of CG and practical elements.

But it's the evolution of virtual production that most excites Yeatman, who began with motion control. "Mocap offers new layers of directing and creativity -- it's more interactive. For me, it's getting back to using your imagination and that's the fun part of it."

By the people and for the people: the VFX of Lincoln

Having created incredible, but invisible, visual effects for Steven Spielberg’s War Horse, Framestore returned for Lincoln, the director’s take on the President’s efforts to have the Thirteenth Amendment passed by the United States House of Representatives. We sat down in London with visual effects supervisor Ben Morris and CG supervisor Mark Wilson to discuss some key shots from the film.
00:00 | 00:00
Download Video

Watch the trailer for Lincoln.
Abe’s dream
Framestore contributed several concepts to Lincoln’s dream sequence, the origins of which were the President’s actual diary entries. “Lincoln was very clear about what he saw,” says Ben Morris. “He described being on the deck of an ironclad boat – the USS Monitor – moving at incredible speed heading towards a coastline that he can never reach – it keeps eluding him. It’s a metaphor ultimately for the Thirteenth Amendment and his second term.”
Original greenscreen plate.
CG elements added.
Final comp with vignette.
Lincoln actor Daniel Day-Lewis was filmed, literally on the last day of shooting, in front of a greenscreen on a 25 foot boat deck, with a fan employed to provide some sense of movement. Framestore would then use the plate to carry out a number of tests and iterations before arriving at a suitable look. “The most difficult aspect of that shot design was trying to develop a photographic ‘look’ to apply to the clean plates,” recalls Morris. “It had to have a sense of dreaminess, but also convey speed in the relative darkness of night.”
To help create a sense of speed, artists developed both a moving starfield (something Spielberg initially dubbed the ‘star gate’, according to Morris) and various water passes that reference the glass-like surface described in Lincoln’s diary. “You then get the problem of how do you convey great speed if the water surface is flat like a mirror, because you don’t see any structure on the surface,” adds Mark Wilson. “In the end we did lots of CG water sims, refracting the plate through them, layering up lots of effects. They were all pulled together in Nuke and mixed with live action elements. Steven wanted the feeling of it being filmed through water, not necessarily being underwater, but almost like developing a picture.”
A further aspect of the dream sequence was that it had to appear photographic, as if recorded using technology from the time. That manifested itself in vignetting, differing frame rates and camera weave – something Framestore looked to practical reference to achieve. “We went so far as to investigate what vaseline would look like when smeared on a lens,” says Morris. “We went into one of our theaters and made an huge rostrum camera – we got a Canon 5D with a clear UV filter on the lens, smeared vaseline all over it, and photographed our cinema screen as we manually advanced the shot frame-by-frame. The resultant footage informed the look of the final comps of the entire sequence.”
Incorporating this look of a being filmed through a vintage lens, the shots were ultimately comped in Nuke. “We’ve got a huge element library and we delved into that too,” notes Morris. “We’d take say a real element and then do a radial twist on it to get a rotational movement. It was a real mish-mash of techniques for the dream sequence.”

CG sky and stars.
Original plate.
Final shot.

Attack on Petersburg
Aboard the Malvern, Lincoln witnesses Petersburg under attack from his forces. Framestore crafted a CG river, banks and the burning city – using both live action elements and digital fire and smoke.
As originally designed, the shot was to be a matte painting. “But Steven got more and more excited about it,” says Wilson. “With a matte painting you tended to get more and more silhouettes but not really the depth and 3D feel of it. When we actually built and rendered the city it felt more photographic.”

CG elements.
Final shot.

The river surface relied on Framestore’s Tessendorf displacement shaders. Destruction of the buildings was realized with Framestore’s in-house version of the Bullet solver called fBounce. Houdini was then used for the fire sims. The shot was rendered in Arnold, and augmented with live action elements like additional smoke and fire. “Actually, some of the explosions in there are elements from War Horse,” notes Morris. “As you bring a shot together like that, we really just kept adding ideas. I think the mixture of CG and real elements give the shot a real, textural feeling”.
The Capital Building
Original plate.
Elements isolated and CG Capital rendered.
Final shot.
Doubling as the Capital Building was the Virginia State Capital in Richmond, often used in films to double as its Washington counterpart. Framestore made a number of alterations to the building for key scenes occurring outside, including Lincoln’s famous second inaugural speech in 1865.
“The production designer Rick Carter always hoped that he could use the front section of this building,” notes Morris. “And he did – we shot a lot of action there in-camera. We were on-hand to assist in wide shots of the Virginia Capital which needed CG extensions.”
To aid in the digital add-ons, Morris visited the Capital Building in Washington to acquire stills photography for photogrammetry reconstruction, since the real building could not easily be scanned. “Historically, LIDAR has played a big part in everyone’s lives,” says Morris, “but we’ve got some new in-house tools that let us actually go and shoot flat or spherical images for photogrammetric scene reconstruction. We used a combination of Photoscan and ImageModeler to reconstruct the Washington Capitol.”
The CG build began with an initial test using a Capital Building stock model to see if it would line up with the Virginia version. When that looked promising, Framestore embarked on a fuller build with the photo reference. “What’s great about the photogrammetry approach is that you can photograph as much as you like with as many close-ups, essentially a load of pictures,” explains Wilson. “Then based on the shots you need, you can process the parts you need rather than going through the LIDAR which requires dense data. But with photogrammetry to actually capture your source material, you’re just clicking away with a camera. It’s very quick and easy to do.”
The final building was rendered in Arnold, with Framestore also contributing crowd replication and extensions for the speech and other scenes at the Capital.
Even more invisible effects
Framestore’s other Lincoln contributions are an array of seamless effects additions, fixes and wizardry. Here’s a rundown of how the studio helped tell Spielberg’s story.
Carriage clean-up – in one shot of a carriage door opening, a member of the lighting crew obscures Hal Holbrook’s face in the reflection of the window. Framestore re-constructed the plate to match a different take of the scene.

In the mirror – A scene of Lincoln’s wife Mary, played by Sally Field, talking with her husband in their bedroom made use of a large mirror. As the shot plays through, the reflection of the camera team was caught in the background, requiring a extensive paint out and scene reconstruction. “It’s through a murky mirror with no keyable elements,” says Morris. “We roto’d Sally Field in the foreground and reflection, taking all the scum off the surface of the mirror and any over Sally’s reflection. We then re-built the room in the reflection behind her, and tracked it back in using a 3D track rather than just a 2D drag through, re-applying new dirt and aging to the surface of the mirror. It’s a classic invisible shot.”
Artifact removal – Although the production filmed in Petersburg to take advantage of its period buildings, certain modern-day artifacts such as powerlines and background elements were unavoidable. In one scene following Lincoln in a carriage, Framestore removed a radio mast and numerous telephone poles and wires, relying on photo reference taken of the surrounding buildings to do the clean-ups, and also added in the Capital dome at the end of the street.
Bloody battle – For muddy battle shots, stuntmen performed the opening scene for hours on end, with Framestore carrying out a bayonet and weapon enhancements and blood removal/additions.

Back into the danger zone: Top Gun 3D

Before sadly passing away in 2012, Top Gun director Tony Scott oversaw the stereo conversion of his defining 1986 film, about to be released in IMAX 3D and on Blu-ray/DVD. We talk to Legend3D founder, chief creative officer and chief technology officer Dr. Barry Sandrew about the art behind the conversion. And we also revisit the ingenious miniature and in-camera effects of the film with special photographic effects supervisor Gary Gutierrez.
00:00 | 00:00
Download Video

Watch the trailer for the IMAX 3D and Blu-ray 3D re-release of Top Gun.

Converting Top Gun

Preparing the film
Top Gun had been shot on Super 35mm film, so the first requirement was to scan the original negative. Digital mastering expert Garrett J. Smith acted as a liaison to Legend3D during the scanning process. “In his opinion,” says Sandrew, “the film had been properly handled over the years and because it was shot Super 35, there was less wear and tear on the negative than others from that era.”
The negative was scanned by EFILM, who oversampled at 6K using ARRI scanners in High Dynamic Range mode, then recorded at 4K by Company3 who extracted as 2K files. “Company3 then trimmed the files nondestructively in preparation for Legend3D’s restoration and conversion that was performed with a working LUT provided by Company3,” says Sandrew.
Creating a depth script
The Legend team then crafted a ‘depth script’ for the film which, as Sandrew explains, was designed to follow the pulse of the story much like a music score. “Most people rarely notice the music score in a movie but when executed well, we are very much influenced by it,” he says. “Our goal is the same in stereo conversion. We want to avoid creating a situation where 3D becomes the story. In fact, the audience should be able to lose themselves in the film, forgetting that they are watching a 3D movie. However, we do want to use conversion to immerse the audience and enhance their emotional and visceral reaction to the storyline.”
00:00 | 00:00
Download Video

Scenes with Charlie (Kelly McGillis) and other actors were not necessarily easy to convert, owing to flyaway hairs and long tracking shots.
The depth script was far from conservative, with Legend’s conversion team – led by Tony Baldridge, stereo VFX supervisor, Cyrus Gladstone, stereographer and Adam Gering, compositing supervisor – ‘exploiting’ the new scan so that audiences would ultimately feel like they were experiencing Top Gun for the first time. “[Tony] loved the flight scenes and wanted the intensity of those moments to resonate with audience’s adrenaline,” says Sandrew. “He felt that they had to be immersed in the action. We had the freedom to set the convergence throughout the film, which allowed us to break the boundaries set by filming in 3D. Cyrus correctly pointed out that placing the jets off screen would not be distracting to the viewer if there was sufficient fluidity from shot to shot. Sometimes we would ‘Multi-Rig’ the convergence between shots to not distract from the story.
For more sensitive moments, such as Goose’s accident, Legend pulled back on the immersion effect. “This is another case where Cyrus made a creative call that I agreed with 100%,” says Sandrew. “He set this scene up with an overall high depth bracket to start off, almost causing an uncomfortable experience for the viewer then we eased into an observation standpoint so as not to distract from the impact of this important moment in the story.”
Inside Legend3D’s office. Click for a larger version.
Conversion tech
Legend3D is unlike most other conversion houses in its technical approach to stereo work. Firstly, the company does not use roto to segment data in each image. “Instead,” explains Sandrew, “we use a form of masking that has evolved over the past 20 years from the digital colorization process that I invented in 1987. It does not involve splines or Beziers but is more of an organic process where the stereo artist creates a series of facets that best defines the bone structure of each actor’s face.”
“The appropriate volume of the actor’s head is based on pre-prepared templates that establishes both the correct spatial relations and relative proportions of all the facial and head features,” adds Sandrew. “This process is in stark contrast to modeling and projection techniques common to the conversion industry. The facets we create are used to reconstruct the faces within one of two virtual stereo stages complete with multiple cameras. One stage automatically creates natural falloff of depth with distance from the camera, while the other allows for more creative freedom in stereo positioning.”
Sandrew suggests that this different approach results in incredibly precise detail. “In fact,” he says, “the masking is so precise that features most people take for granted, like eye highlights, are always inset by a fraction of a pixel, the size of which is dependent on the distance of the actor from the camera.” A new addition to Legend’s tech arsenal is the ability to view a segmented shot that has been placed in depth in full motion within the stereo conversion environment and simultaneously on an accompanying stereo monitor, allowing on the fly adjustments.
The first review
“In the beginning we had no idea what Tony’s expectations were for the film,” recalls Sandrew. “After all, he was new to the conversion process and I’m sure he was somewhat skeptical that the story of his 28 year old iconic film could be enhanced with the introduction of a third dimension. Consequently, we were initially given free reign over the look and feel of the first reel so that Tony could see whether this was actually going to work.”
It turned out that Legend was not present during Tony Scott’s screening of the first converted reel (which occurred privately with Pat Sandston, Associate Producer of Jerry Bruckheimer Films). But there was little to worry about. “At the conclusion of that very first screening of Top Gun,” says Sandrew, “Pat informed us that Tony was blown away by the experience of seeing his film in stereo for the first time. As a consequence Tony felt comfortable giving us complete creative freedom on the full conversion process and was content to screen each reel as we completed them in stereo depth.”
Converting key scenes
Inside the cockpits
Tom Cruise stars in Top Gun as Maverick.

Cockpit POVs were particularly challenging for Legend since they were often tight close-ups of the pilots. “They required both realistic depth for the interior of cockpits while maintaining accurate volume in the actors faces,” explains Sandrew. “Tony Scott came to realize that the cockpit shots could not have been filmed in the same manner with stereo rigs had they been available 27 years ago.”
Confounding the issue were jet canopy reflections wrapping around the pilots that needed to be placed in depth with the appropriate transparencies. “To handle this problem accurately, we visited the Midway Aircraft Carrier in San Diego so we could sit in F14s to determine how reflections and accompanying jets flying in the background should be handled in the conversion process,” says Sandrew. “One thing we determined from the F14s is that fighter jets flying in the background appeared somewhat distorted at the maximally curved edges of the canopy due to refraction. This required a different depth treatment than jets observed from different portions of the canopy.”
“Tony Baldridge is always quick to point out that long lenses were used extensively in Top Gun,” adds Sandrew. “This tends to compress space, flatting the subject in frame. While this can be desirable in a 2D film, for a 3D film that is shot ‘natively’ it can be a serious issue. However, with 2D to 3D conversion the sky is the limit (no pun intended). We are lens agnostic and can create depth that would otherwise be impossible through conventional capture.”
Dogfights
The frenetic dogfights and aerial scenes in Top Gun were achieved with unprecedented access to the US Navy, second unit photography and some ingenious miniature plane special effects photography (see below). In order to convert the fast action shots and the associated atmospheric effects for explosions, smoke and clouds, Sandrew says Legend relied on its proprietary toolset. However, he notes also that the original framing of the shots proved incredibly suitable for 3D. “Twenty-six years ago when Tony Scott was lensing Top Gun for the big screen, the idea of 3D was the farthest thing from his mind,” says Sandrew. “But as I remarked to him at the wrap, the way he composited each shot was ideal for stereo. The fighter jets were for the most part in center screen, which improves the effectiveness of negative stereo placement in front of the screen.”
00:00 | 00:00
Download Video

In this scene, Maverick and Goose go after Viper.
Legend also sought professional feedback on the aerial shot conversions, an easy task with Miramar Air Force Base literally just down the road from the San Diego studio. “We often invited active and retired Top Gun pilots to screen the dimensionalized aerial shots in one of Legend3D’s RealD theaters so we could assess the accuracy of transient vertigo that resulting from the combat flight sequences,” says Sandrew. “We wanted to simulate the natural sense of vertigo during combat flight without making the audience sick. Fortunately the aerial shots were fairly quick so we knew that any sense of vertigo we allowed would be minimal but highly effective.”
“In fact upon leaving the theater one retired pilot thanked me for reminding him what a barrel roll in an F14 felt like,” Sandrew adds. “I believe that the way we handled the stereo conversion really brought a greater authenticity to those shots, giving the audience a true sense of what it felt like to be flying a fighter jet in a dog fight situation. I had the distinct pleasure of screening the fighter jet scenes in 3D with Clay Lacy, an icon in aviation history and the original aerial photographer on Top Gun. Clay was amazed that we were able to enhance his cinematography in three dimensions. He was extremely comfortable with the stereo conversion and thought the realism we were able to create was simply unbelievable.”
The IMAX 3D release of Top Gun begins on Feb 8th, and the Blu-ray is available from February 19th.
The hardest shots are not what you think
When asked which shots were the most challenging to convert, Sandrew says they were the ones people would consider the easiest. “Charlie with her wild hair and Maverick sitting in the bar, their profiles backlit complete with light spill, posed a challenge to our compositing artists who were tasked with maintaining fine flyaway hair while eliminating stretching artifacts from the conversion process.”
“And Tony Scott loved to use long dolly shots of actors walking toward the camera,” he adds. “One such shot involved 1055 frames of Maverick and Charlie walking toward the tracking camera down a long hallway, stopping at both the beginning and end of the shot for prolonged dialog. Once again, back lit, the profiles and hair against the ever-changing verticals in the background were a challenge.”

Realism from raggedness – the effects of Top Gun

Top Gun’s special photographic effects supervisor Gary Gutierrez recalls ‘bucking the system’ when he and artists from Colossal Pictures/USFX helped realize the aerial dogfights for the film. Specifically, the team resisted the use of bluescreen motion control – a hot effects technique at the time – and instead went for a more classical in-camera approach to shoot miniature planes and effects. It was something they had also done successfully for Philip Kaufman’s The Right Stuff (1983).
The Top Gun effects crew. This photo was taken on the last day of shooting, December 24th, 1985. Courtesy Gary Gutierrez.
“There was this realism in having ragged photography,” recalls Gutierrez, who spoke to fxguide about his memories of working on Top Gun. “Ironically, after The Right Stuff and Top Gun, computer moco systems and CG solutions did the same thing we did – which was to imitate a certain raggedness of camerawork for action shots. It just added more vitality to the look of the image, and had more of a sense of less perfect-ness.”
The result, says Gutierrez, was that this approach made it blend in with the second unit and aerial photography in Top Gun. Most of those shots were somewhat messy and fast-moving, owing to the method of capture and Tony Scott’s desired style. Coupled with fast edits for the aerial scenes, the shots intercut and most people did not know what was real and what was a miniature.
Physical effects
So what were the effects solutions used for Top Gun? Here’s a list of just some of the clever ways shots were achieved (for detailed information, check out Cinefex #29 or see The Making of ‘Top Gun’ featurette on the Top Gun Blu-ray/DVD).
Shooting at Oakland. Screenshot from ‘The Making of Top Gun’ featurette on Top Gun Blu-ray/DVD. Copyright Paramount Pictures. All rights reserved.
The drill attachment for ‘shaky cam’. Screenshot from ‘The Making of Top Gun’ featurette on Top Gun Blu-ray/DVD. Copyright Paramount Pictures. All rights reserved.
A falling plane is dropped from a man-lift. Screenshot from ‘The Making of Top Gun’ featurette on Top Gun Blu-ray/DVD. Copyright Paramount Pictures. All rights reserved.
Models: scores of model planes were crafted, included various sizes of F-14′s, F-5s and Russian MiGs repurposed from RC models and model kits.
Filming location: this actually occurred on a hilltop location in Oakland, California, surrounded by a then un-built housing development, providing space for explosions and clear background sky views (only one gray day necessitated the use of HMI lights and a large sky blue backing).
Shooting: since bluescreen or motion control was not being used, shots were acquired in several ways, including simple handheld moves. Planes were suspended on wires and rods or simply dropped from man-lifts (which were also used to film from). Rick Fichter was the DOP for USFX.
Shaky cam: a purposely ragged style of shooting mimicked specific styles of camera movement that would be seen in actual photography of the full scale objects. The effects team took this one step further by bolting on a drill attached to an off-set piece of wood to the camera in order to give the shots an unbalanced and ‘shaky feel’ – and it wasn’t long before other effects shops were using a similar technique. “We would see it in the very next thing ILM did, one of the Star Trek films,” says Gutierrez. “They actually started shaking the camera in their moco shots, adding roughness and a looser kind of look and vibration. And it’s now become part of the bag of techniques in CG to take the curse off of a shot, to add in deliberate imperfections that you might get in live action photography.”
Flat spin: Maverick and Goose’s fall into the ocean included a shot of their plane spinning right down towards the camera lens protected by a Lexan. For that shot, a grip took a Tomcat model up on a man lift and gave it a slight spin before releasing (and in the process winning a $5 bet that he couldn’t hit the camera – which he did twice).
Tracer fire: to simulate the look of tracer fire, a rig was set up to shoot small mortars of magnesium through the air past the model plane. Ultimately deemed unsuccessful, the shots were eventually achieved mostly with traditional animation and rotoscoping (something also used for cockpit head-up displays and a Sidewinder missile hit on a MiG in the film’s final battle).
Explosions: For missile hits, the effects team rigged pyro on the planes using napthalene, black powder and gasoline. “We shoved these eight foot models on fire with pyrotechnic chemicals and off of the ramp a 100 feet in the sky,” recalls Gutierrez. “Someone had devised a big boxing ring sized pad of foam and the first time we tried that it caught on fire! But luckily no-one was injured.”
Through the viewfinder
“There was a real pleasure that all the cameramen enjoyed in shooting the effects the way we did,” says Gutierrez, “which was finding your shot looking through the viewfinder. That job was starting to be taken away at that point. There’s nothing like a viewfinder and a magic little window to inspire. The world of CG, which I have great respect for and use a lot, does have its limitations. You may have a happy accident every now and then but circumstances are not geared for having them. It’s sometimes too perfect.”
All images and clips copyright Paramount Pictures. All rights reserved

Working in zero light for Zero Dark Thirty: VFX making

When U.S. Navy SEALs raided a Pakistan compound on May 2nd, 2011 and killed Osama bin Laden, it was an almost moonless night. So when director Kathryn Bigelow sought to re-create the raid in Zero Dark Thirty, she and DOP Greig Fraser had a very clear mandate to film the scene in almost pitch darkness. The result is an authentic re-telling of the hunt for the Al Qaeda leader, but also one that posed a significant challenge for the visual effects crew from Image Engine, called upon to create photorealistic stealth helicopters used in the daring raid, as well as several other key effects in the Oscar-nominated film.
Note: this article contains major plot spoilers

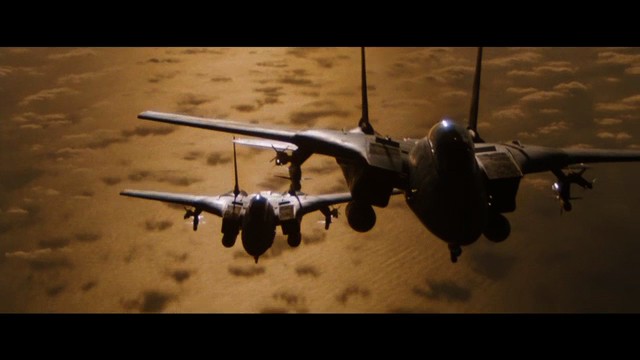
The helicopters – avoiding the game look
Two full-sized stealth helicopters were built in London for the film. Initially, these were designed to be filmed on large gimbals for shots of the SEALs traveling to the compound in Abbottabad, Pakistan and for exterior views, where rotors and environments would be added. Ultimately, due to changes in the action and lighting issues (discussed below), most of the helicopter exteriors were achieved as Image Engine creations.


CG stealth helicopter and dust sim.
Final shot.

However, the stealth helicopter props were invaluable in providing reference for Image Engine in designing and modeling CG versions. “They were all CNC milled so we got the original 3D data for them which was a huge jumping off point,” says visual effects supervisor Chris Harvey. “Then it was a process of taking them and making them look real, with dents, divots, scratches, grooves and bolts. We’d work on the lookdev until you couldn’t tell the difference.”
One of the hardest aspects of the chopper design was that, by design, they looked like game models. “They’re a few flat polygons with sharp edges,” notes Harvey. “So they kind of look CG anyway – even the real ones. Actually even Kathryn kind of called them ‘gamey’. They were really sensitive to reflection angles. When the helicopter moved, it’d be bright and the next time it’d be black. So we had to do some funky curve reflections and some animated reflection cards that we’d track on, just so they wouldn’t pop on with weird reflections.”
The dust effect
Original plate with stand in Black Hawk.
Clean plate.
CG stealth helicopter.
Final shot.
For scenes of the stealth helicopters taking off, landing, and later for a crash sequence, Image Engine had another major challenge – dust. But Harvey took the bold step of recommending to production that they shoot real helicopters – Black Hawks – that would later be replaced with the stealth versions. “Well, they straight away said, ‘What about the dust?’ I basically said it was better to get real interaction with the environment and we’ll replace what we have to replace.”
The visual effects team then had three main approaches to deal with dust:
1. In the case where a real helicopter created a performance that Bigelow wanted exactly in the end, Image Engine match-moved the stand-in and then substituted their digital stealth helicopter, embedded it into the plate dust, and then added their own dust sims on top.
2. In other cases, the performance would be tweaked with the digital helicopter. “The advantage of using the real helicopters was that you got a whole bunch of nuances in the motion of the helicopter that would have been really hard to get,” says Harvey. “And the dust interaction, which was awesome, looked real because it was real, other than the stuff we used to help integrate it.”
3. Finally, some shots would rely on throwing away any plate footage and creating helicopter and dust shots from scratch, although of course all the footage aided in animation and dust reference.
The digital dust was simulated in Houdini. “We built a helicopter dust rig where we’d run a sim to create the rolling vortexes of the dust,” explains Harvey. “We’d also add in any objects to the sim, like a wall, so it would flow realistically.”
And dust turned out to be a crucial method used by Image Engine to reveal the shape of the stealth helicopters, especially when they were shrouded in darkness. “You couldn’t always shape it with say a rim light,” says Harvey, “so we would try and choreograph the dust to reveal the chopper almost as a silhouette. We ended up using non-lighting techniques to add what you would typically do with the lighting anywhere we could – against the sky or a bright part of the wall.”
In some shots there would also be pieces of debris, from paper to styrofoam cups, pop cans and bottles, pieces of paper and plastic – also simulated in Houdini. “So first there’d be a fluid sim for the dust would be would used to drive a series of rigid-body geo, some cloth objects and soft-bodies, depending on whether it was paper or cans,” says Harvey.
Journey to Pakistan
After taking off from Afghanistan, the SEALs fly over the border to Abbottabad in a series of shots made up of real aerial backgrounds filmed over Lone Pine, CA, and Image Engine digital stealth helicopters. Harvey lead the shoot using three Eurocopters through a number of canyons and above varied terrain in the area. “We shot with real plates rather than go all digital because it really helped provide something authentic,” says Harvey. “It removed a lot of the guessing game and back and forth of, ‘Well I think a real helicopter would bank here’. We altered the animation a little bit because they were smaller helicopters. We would track them and then dampen the animation curves so they all seemed heavier.”
The helicopters travel over the border to Pakistan.
The Lone Pine plates were also filmed during the day. And that’s where a further significant challenge lay for Image Engine – turning these daytime shots into night. “In the end that involved a ton of work from our comp team to re-grade all of the plates to look like they were shot at night,” says Harvey.
Rotor blades on the digital helicopters were something the VFX supe played close attention to. “We started with footage that had been shot of the Black Hawks, then we took our CG model and we ran out a really exhaustive series of wedges. We set our rig up so you could literally enter in an RPM value for the rotors, then ran out a series of side-by-side renders against the real footage, running at different RPMs. We found the RPM setting that matched and that became the default value that we plugged in.”
The compound
Day-for-night shots were also required for scenes of the SEALs arriving at the compound. In Jordan, real Black Hawks standing in for the digital stealth helicopters were filmed on a life-sized set (designed with the help of Framestore concepts and 3D models) during a narrow dusk window from 4pm to 5.30pm due to costs and safety concerns of having to fly with night vision. “In some cases,” says Harvey, “you’d have the sunset which gave you a fancy magic hour lighting conditions that we’d have to go in and do sky replacements and re-grading and all of that.”

Original plate.
Dust sims.
Final shot.

In addition, shooting during the day meant that there were no suitable HDRs that could be taken. Image Engine artists were ultimately required to tweak each helicopter shot on a per-shot basis. And even then, once the DI process began, some shots required re-comping, as Harvey explains:
“We would light everything a stop or two bright so we could bring it down in the DI, but there needed to be a huge amount of collaboration between us and the DI because there was such a narrow band of light level that we had to work with. If we went a point to low, then once it went through the print and a LUT went on it, everything just went black. It was a very fine line. There was a bunch of shots we had to redo because they just couldn’t hold up under projection environments. So at the last minute we had to go in and re-grade and comp 25 shots just because the margins were so thin.”
Outside the compound.
There are a few daytime shots of the compound, however, and these included digital augmentations such as trees and surrounding mountains. “At night we could get away with not adding them,” says Harvey,” although we did add some distance lights. One of the days that we had the Black Hawks there filming the crash and the take off, I just rode back with them to the military base and we shot a whole bunch of aerial night plates and city lights – 15 minutes of footage of random flickering lights. Comp would just cut them out and piece them in back in as lights for deep backgrounds.”
The crash
As one of the stealth helicopters hovers over a compound wall it is caught in its own downwash before the pilot is able to bring it to the ground. No one is injured, but the tail ends up resting on the wall. On the Jordan set, the crash was filmed with the prop helicopter on a crane. However, several factors resulted in Image Engine re-imagining the sequence.
Firstly, the performance of the crane moving the prop helicopter was deemed too slow. At the same time, some of the shots from the crash sequence were re-choreographed because Bigelow and the filmmakers received new information about what may have happened during the raid. A third factor was related to the lighting response of the prop. “The prop behaved a certain way in the lighting conditions on the set,” explains Harvey. “It always looked a little too source-y for Kathryn, like there was a moon somewhere, or that there was too big a hit. She wanted everything to be always moonless, ambient, without a really strong key or backlight.”
The SEALs leave the downed stealth helicopter.
This meant that Image Engine crafted the crash with a digital stealth helicopter, and also completed other exterior scenes of the helicopters at the compound that had originally been filmed with the prop. “We went through hours of footage of what we shot there and we were looking for plates that we could cut the rig out at a nice angle, and then we would put our own performance in,” says Harvey. “We ended up constructing this whole new sequence for Kathryn, and went through a couple of iterations to get what she wanted.”
Bigelow’s request was for a ‘visceral, in-your-face moment’ as the crash occurs. “A lot of that came through dust and debris thrown into camera,” says Harvey. “When the tail goes onto the back wall, both of those shots are entirely digital in the end. We animated the action, which was cached out, given to the Houdini guys, and they would run a rigid-body destruction simulation across the top of the wall and the barbed wire to rip off the concrete and wire. That would be piped back into the animation to deform and crumple the tail a little bit. Then all that would be passed back into Maya for lighting and rendering. Then dust sims were put on top of that. Then there would be piles of dirt and sound and pebbles that got kicked up to make it in your face.”
Night vision
Peppered throughout the tense raid sequence are several night vision point of view shots. To get these in-camera, DOP Greig Fraser bolted night vision lenses onto the ARRI Alexas used for filming, and relied on infrared lights. Occasionally, Image Engine was required to add a CG element into one of these shots and so had to match the lenses. “There were a few different ones used that had different scaling and noise on them,” says Harvey. “So just like you would shoot lens grids, gray balls, and gray charts to get your film grain with regular lenses, we shot it again with all those lenses.”
Leaving the chopper behind
The mission, which was code-named Operation Neptune Spear, is a success and bin Laden is killed and his body taken back to the Afghan base. Before leaving, the SEALs destroy the downed stealth helicopter.
This was achieved as a practical explosion of one of the prop stealths orchestrated by special effects supervisor Richard Stutsman (who had previously worked with Bigelow on The Hurt Locker). “It was pretty awesome,” exclaims Harvey. “We’d been shooting for weeks and we were right there on the edge of this little town and everyone was always out checking things, especially this time because we had Black Hawks flying around – it was also a little bit tense because we were a mile away from the Dead Sea and right on the border of Israel.”
The downed stealth helicopter is blown up.
Image Engine made some slight augmentations to the final explosion shot, replacing the initial view of the helicopter in the plate because the prop had been cut up to fit the explosives in, and then adding some flying rotors and debris, along with the remaining flying helicopters. The shot was also given a night grade since it had been filmed at dusk.
Setting the scene
Of course, the compound raid sequence is the climax of the film – but preceding this is the story of CIA agent Maya (Jessica Chastain) as she attempts to zero in on bin Laden’s whereabouts. Image Engine completed various visual effects for environments, military bases and several bombings.
Explosion at Camp Chapman
Wide shots of military bases in Afghanistan, including one of Camp Chapman, made use of reference photography and on-set elements. “We would do a layout pass of each of the environments,” says Harvey, “and that was with gray-shaded boxes and a quick matte painted paint-over. And we’d get buy-off on building density, locations, cars. Then Kathryn wouldn’t want to see it again until it was mostly done. The Chapman base had 400 digi-doubles in the background, cars with dust in the background – just to make it feel like a bustling base.”

Final shot just before the explosion.
The explosion at low angle.

It is at Chapman that a suicide bomber stalls the progress of Maya’s search by killing her fellow agent Jessica and others in a car bombing. The explosion is seen in two shots. Firstly, the low angle view has smoke and debris filling the frame. For that, production shot several different passes with multiple cameras – a clean plate, dust canon, an air canon shooting into people, a fireball pass, a clean car and the car blowing up. Richard Stutsman provided the practical explosion.
Image Engine then took those elements into comp and layered the shot. “We did a little augmentation of the environment immediately around the car,” adds Harvey. “In order to shoot all those passes takes a little time so the sun would change position and the shadows would be falling in different areas. So there was some 2D re-lighting of the shot. Then down the street that’s all a matte painting extension.”
Original plate.
Houdini sims.
Final shot.
On the high and wide shot, the same passes were all filmed, but it was decided the explosion needed to have more impact. Image Engine replaced and matched the practical shot with a digital version created in Houdini, also implementing shockwaves, shattering glass and integration to the surrounding vehicles and buildings.
London and Islamabad bombings
In a late addition to Image Engine’s workload, the July 2005 terrorist attack on London is highlighted in a scene depicting the explosion of a double-decker bus. Originally intended as just hinting at the devastation, the explosion is shown more fully as the bus passes a clump of trees. “We organized our own pyro shoot here on a stage and blew some stuff up that we used for elements,” says Harvey. “Then from some of those cameras from the Chapman explosion, we went in and cut out stuff we could use. Then like a jigsaw puzzle we built up the explosion that happens behind the hedge and the trees for the bus.”
Director Kathryn Bigelow.
The 2008 Islamabad Marriott Hotel attack is also shown in the film, with the bombing survived by Maya and Jessica as they dine in a hotel restaurant. “Richard Stutsman did an amazing job on that explosion,” notes Harvey. “We just had to do a fair amount of paint-outs – he had pull wires on tables, chairs, people. We did a bit of augmentation in terms of extra fill smoke and a little grading and some fire enhancement to make it feel like there were some core flames. Then Kathryn got us to make a couple of wine glasses and bottles fall over which hadn’t in the blast – so we went in and painted out any remaining objects on the tables that didn’t tip over. ”
Attention to detail
It was that attention to detail for shots such as the Islamabad explosion that gave the film so much authenticity, according to Harvey. “Kathryn has a really different eye for visual effects – she didn’t dwell on stuff that people would expect, but we were doing some fine work, going into crowd shots and changing the shape of turbans and other small things, even changing the colors of people’s robes – no one will ever know! We did a ton of stuff like that, but for Kathryn it was just making it more authentic.”